FreeProxy can be used to proxy SMTP mail. This is typically referred to as "Internet Mail" and is exchanged by an Internet Service Provider (ISP).
Without FreeProxy, you would connect a mail client such as Outlook Express® or Outlook® directly to your ISP's mail servers. They often supply install kits for this. Under the covers, your mail client will be accessing two different servers; one for incoming mail and one for outgoing mail.
Note: Outlook Express enables you to set up "Hotmail" access. This is done in the normal way without the need for POP/SMTP servers being specified in the FreeProxy Control Centre, however, make sure that your internet browser settings on the computer you are running Outlook Express on is set up to access FreeProxy.

In this diagram, your ISP hosts 2 servers. The SMTP server handles outgoing email. All items presented to this server are on-sent to recipients. The POP server will hold your email until you are ready to retrieve it. When you connected to the POP server you retrieve your email. These connections are handled by your email client.
When your email client wants to send email, it connects to the SMTP server on port 25. When it wants to retrieve email, it connects to the POP server on port 110. The network traffic between the client and the SMTP server is represented by the orange line and the client/POP server by the green line.
When using FreeProxy, you no longer are connecting directly to the 2 email servers but rather via your own proxy server.
To complete the setup you will need to
Configuration for both these steps are shown below.
Configuration is given here for both Outlook Express and MS-Outlook.
For these examples, we will name you Angela Smythe. You connect to servers as follows:
You MUST have all this information before you can proceed. If not, contact your ISP. If you are already connected directly to your ISP, this information would already be in your email client. You will have to change the information on the client systems connected to FreeProxy.
You should configure each mail client this way using the appropriate information.
From the Outlook Express menu, select
Tools èAccounts.
Click on the Mail Tab, press the Add button and select Mail...
You should see the same as in the picture above.

This is the name your recipients will see on emails sent to them. Press Next.

and press Next

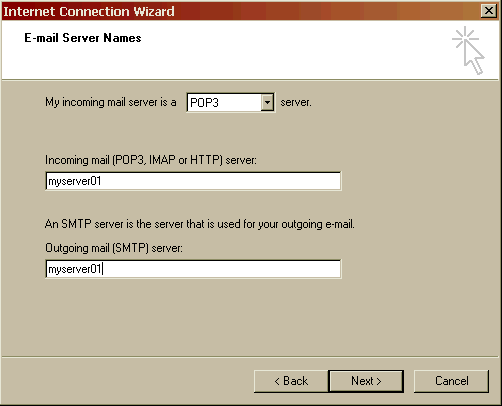
You will notice that here we use YOUR server names. NOT the ISP server. The connection to the ISP is handled by FreeProxy. What you set up here is the connection to the server running FreeProxy. This is your own server on your own internal network.
Press Next.

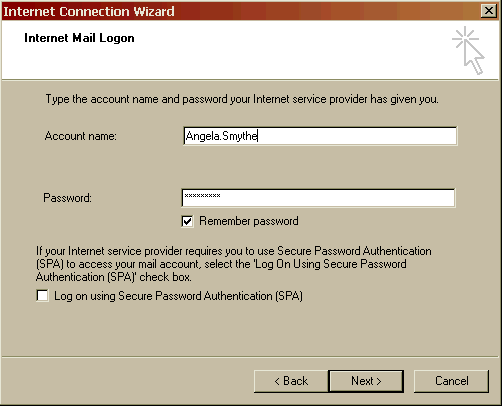
This is the name and password that logs you on to your email mail box and is typically different for each user.
Press Next.

Press Finish.

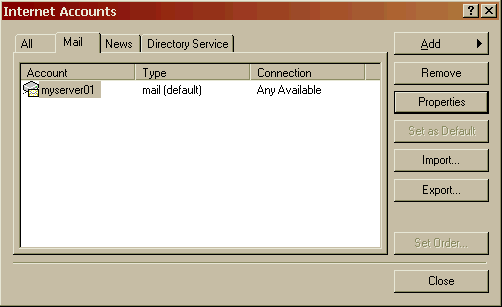
You should see something similar to the following:

Highlight the account you have created (as shown), then select Properties.
The properties dialog box enables you to modify your setup.
Select the Advanced tab.

Notice the outgoing mail and incoming mail port numbers. In your configuration these refer to the port number you will define as Client Ports in FreeProxy. When you get to configure FreeProxy as described below, your client port for SMTP MUST be the same as defined here. In this case 25. You can change these port numbers, as long as the client port in FreeProxy matches the port numbers you set here. For example, you could pick 9765 for the Outgoing mail client. If you do, then when you configure the SMTP option in FreeProxy, you MUST use 9765 as the client port.
Make any changes if you need to and press OK to accept.
Continue with configuring FreeProxy here.
From the Outlook menu, select
Tools è
Services. Click on the Add button
You should see the same as in the picture below.

Highlight Internet Email (as shown) and press OK.

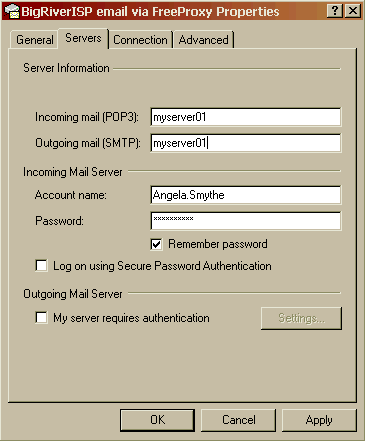
Proceed with configuring the Servers. Press the Servers Tab.

You will notice that here we use YOUR server names. NOT the ISP server names. The connection to the ISP is handled by FreeProxy. What you fill in here is the connection to the server running FreeProxy. This is your own server on your own internal network.
The name and password that logs you on to your email mail box is typically different for each user.
Proceed with the configuring the connection.
Click the Connection tab.
Check that you are connecting using the LAN. Check the radio button as shown below.

Proceed with checking the Advanced options.
Click the Advanced tab.

Notice the outgoing mail and incoming mail port numbers. In your configuration these refer to the port number you will define as Client Ports in FreeProxy. When you get to configure FreeProxy as described below, your client port for SMTP MUST be the same as defined here. In this case 25. You can change these port numbers, as long as the client port in FreeProxy matches the port numbers you set here. For example, you could pick 9765 for the Outgoing mail client. If you do, then when you configure the SMTP option in FreeProxy, you MUST use 9765 as the client port.
Press Apply to accept the configuration.
Press OK
Exit from Outlook and then start Outlook again before the changes take effect.
The Define/Change change Port Redirection dialog box is shown below.

The dialog box on the right is taken from your configuration of MS Outlook . A very similar dialog box is presented if you were configuring Outlook Express and the same thing applies. The point being made is that the Port Number defined in the email client MUST be the same as the Client Port in FreeProxy. It can be any number from 1 to 65000 however 25 is usual. You can change this number as long as the two numbers shown below are the same.
The SMTP server in FreeProxy is the server name of your ISP. Likewise, the server port is the port number for your ISP's SMTP server. The default is 25 and this very seldom is different. The server port number and the client port number are completely independent. Changing the Client port number does NOT mean that you also have to change the server port. For example, the two ringed numbers could both have been 3457, whereas the Server Port would remain at 25.

The same point is being made here as previously with the SMTP connection. This time the Incoming mail connection uses the POP server and the Outlook Express Advanced properties is shown to illustrate the point.